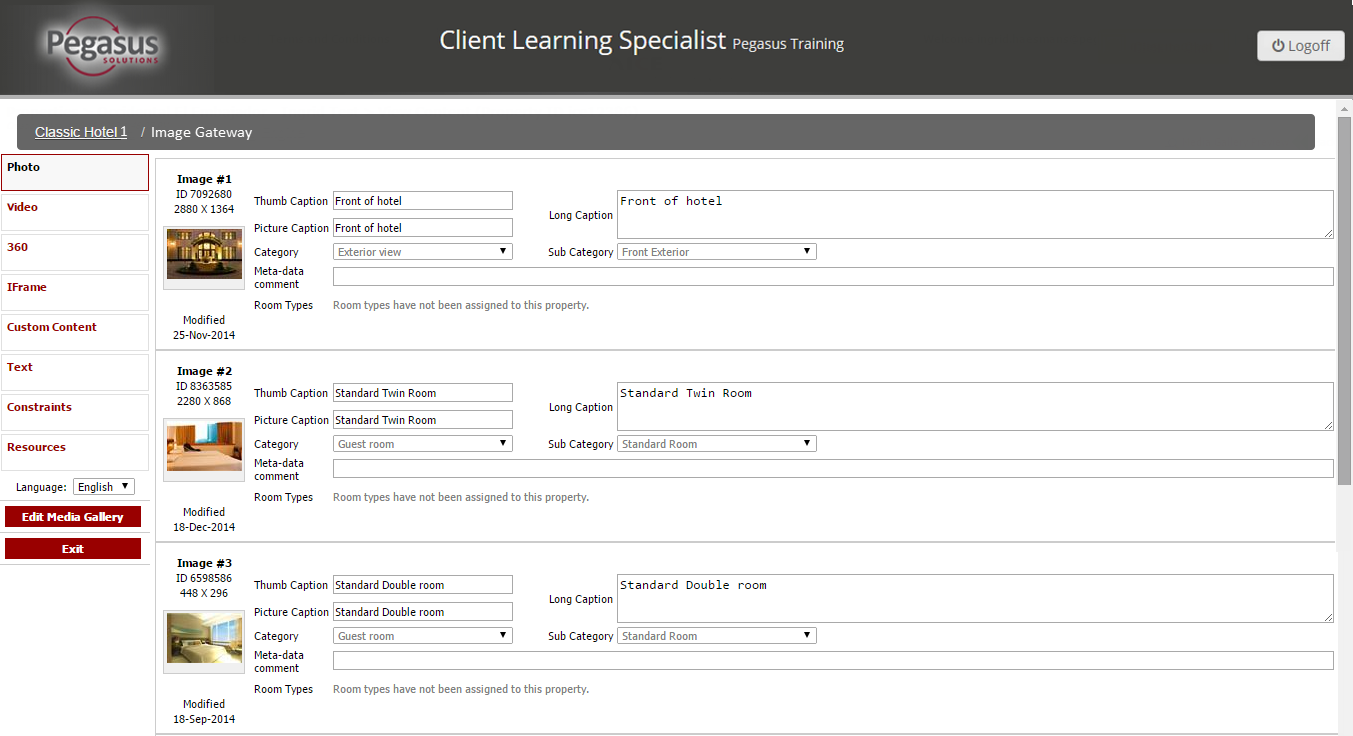
The Image Gateway is a centralized storage area for the management and distribution of digital assets, for example images, to ADS/GDS sites and key travel channels. Click the Image Gateway link on your Property Dashboard to add or edit images for ADS/GDS distribution channels. You are navigated to the Image Gateway interface. Currently you will be using the Photo tab.

| Part | Requirement |
| Photo Formats | Acceptable formats are .JPG, .PNG, .GIF, .TIFF |
| Size | Minimum is 1913 x 2880 pixels |
Quantity |
|
Follow the steps below to add a new image:
Step |
Action |
||
1 |
Click the Image Gateway link from the Property Dashboard. | ||
2 |
From the Image Gateway screen, click the Edit Media Gallery button. |
||
3 |
Click the Add New Image link. A new image section with 'No Image selected yet' message in the preview area appears.
|
||
4 |
Click the Choose File button to open a dialog box to navigate to an image file on your local computer or network. | ||
5 |
Click the Open button, and the image appears in the preview area.
|
||
6 |
Enter information for the image in the content fields: |
||
7 |
Ensure the display order of the images is suitable. The image order can be seen above the image ID. To re-order images, see Sequence your images.
|
||
8 |
Once all images are added, proceed to publish your images by clicking the Exit and approve changes button. |
||
9 |
Once your images are published, the Processing Complete message will appear. Click the property name at the top of the screen to return to the Property Dashboard. |
Follow the steps below to modify captions and categories associated with an image:
Step |
Action |
||
1 |
Click the Image Gateway link from the Property Dashboard. | ||
2 |
From the Image Gateway screen, click the Edit Media Gallery button. |
||
3 |
Find the image you would like to edit. | ||
4 |
Update the applicable information in the caption and category fields. See Fields descriptions for more information.
|
||
5 |
Proceed to publish your changes by clicking the Exit and approve changes button. |
||
6 |
Once your images are published, the Processing Complete message will appear. Click the property name at the top of the screen to return to the Property Dashboard. |
Follow the steps below to modify the image display order:
Step |
Action |
||
1 |
Click the Image Gateway link from the Property Dashboard. | ||
2 |
From the Image Gateway screen, click the Edit Media Gallery button. |
||
3 |
Find the image you would like to re-order. |
||
4 |
Click the Click & Drag button, located below the image preview, to move images up or down in your image list. It is recommended to put an exterior image in first position and then guest rooms second.
|
||
5 |
Proceed to publish your changes by clicking the Exit and approve changes button. |
||
6 |
Once your images are published, the Processing Complete message will appear. Click the property name at the top of the screen to return to the Property Dashboard. |
Follow the steps below to replace an image with another image:
Step |
Action |
||
1 |
Click the Image Gateway link from the Property Dashboard. | ||
2 |
From the Image Gateway screen, click the Edit Media Gallery button. |
||
3 |
Find the image you would like to replace. | ||
4 |
Click the Choose File button to open a dialog box to navigate to an image file on your local computer or network. | ||
5 |
Click the Open button, and the image appears in the preview area.
|
||
6 |
Proceed to publish your changes by clicking the Exit and approve changes button. |
||
7 |
Once your images are published, the Processing Complete message will appear. Click the property name at the top of the screen to return to the Property Dashboard. |
Follow the steps below to delete an image:
Step |
Action |
1 |
Click the Image Gateway link from the Property Dashboard. |
2 |
From the Image Gateway screen, click the Edit Media Gallery button. |
3 |
Find the image you would like to delete. |
4 |
Click the X button. |
5 |
A popup message is generated, click the OK button to confirm the deletion. |
6 |
Proceed to publish your changes by clicking the Exit and approve changes button. |
7 |
Once your images are published, the Processing Complete message will appear. Click the property name at the top of the screen to return to the Property Dashboard. |