Edit default travel agent commission policy

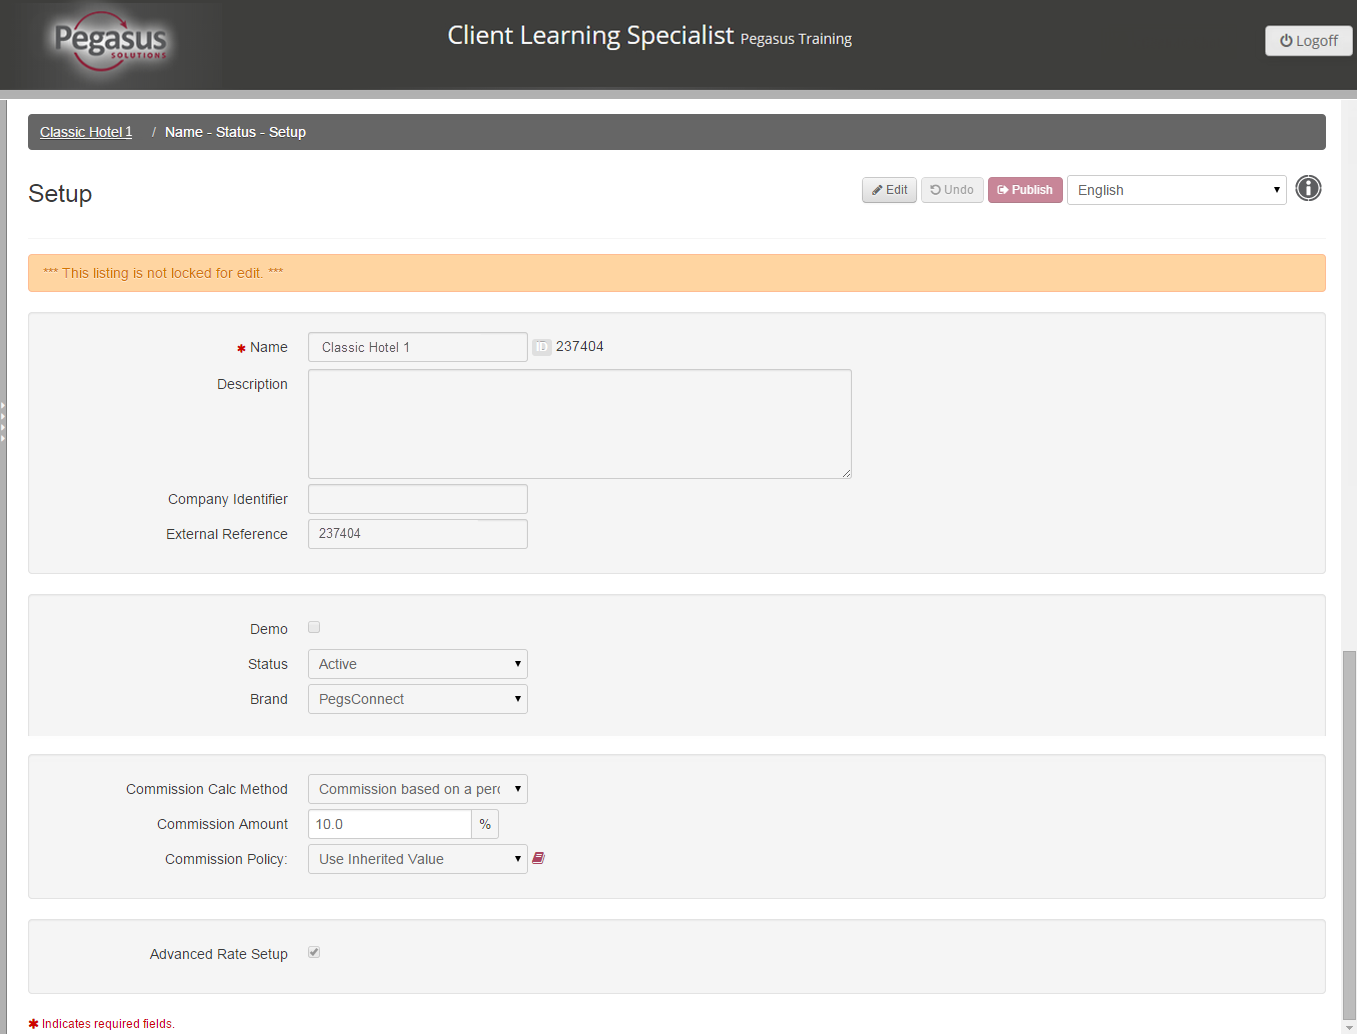
The Name - Status - Setup link on the Property dashboard will take you to the Setup screen, where you can review initial property information.
Caution: Do not amend your hotel name or status, as this may cause your hotel to be unbookable in the distribution channels. Contact your Pegasus Representative if an update is required. |
The following fields are referenced on the Setup screen:
| Field | Description | ||||||||||||||||
| Name | Property name in the distribution channels. | ||||||||||||||||
| ID | Your Property identification number
in RVNG.
|
||||||||||||||||
| Description | Not used. | ||||||||||||||||
| Company Identifier | Not used. | ||||||||||||||||
| External Reference | Optional - Property identifier.
It can be used, as an alternative to the ID and Name fields, to search for the property in RVNG Property Maintenance Module (PMM) (see Property Search) and Call Centre Module (CCM). |
||||||||||||||||
| Demo | This field is checked when the property is used for demonstration only. | ||||||||||||||||
| Status | Set to Active
to display your property in the relevant distribution channels.
|
||||||||||||||||
| Brand | Determines the look and feel style of the RVNG screens. | ||||||||||||||||
| Commission Calc Method | Determines the travel
agents commission standard for your hotel. All items and rates will inherit this setting, unless otherwise stated during the item build process (see Item Setup tab) and rate build process (see Rate Wizard tab). |
||||||||||||||||
| Commission Amount | |||||||||||||||||
| Commission Policy | |||||||||||||||||
| Advanced Rate Setup | Must be checked. It will allow you to create multiple items and multiple rate plans for the property. |
Follow the steps below to update standard commission information for your hotel.
Note: All items and rates will inherit this setting, unless otherwise stated during the item build process (see Item Setup tab) and rate build process (see Rate Wizard tab). |
Step |
Action |
||||||||||||||||||||||||||||||||||||||||||||||||||
1
|
To access the Setup
screen:
|
||||||||||||||||||||||||||||||||||||||||||||||||||
2 |
Click the Edit button to place the screen in edit mode. |
||||||||||||||||||||||||||||||||||||||||||||||||||
3 |
Click the OK button to confirm. |
||||||||||||||||||||||||||||||||||||||||||||||||||
4 |
From the Commission Calc Method drop-down menu select the applicable commission method:
|
||||||||||||||||||||||||||||||||||||||||||||||||||
5 |
Click Save Changes. |
||||||||||||||||||||||||||||||||||||||||||||||||||
6 |
Click the Publish
button to send the saved updated to all distribution channels.
|
||||||||||||||||||||||||||||||||||||||||||||||||||
7 |
Click the OK button to confirm. |
||||||||||||||||||||||||||||||||||||||||||||||||||
8 |
Click the property name at the top of the screen to return to the Property Dashboard. |