Note: This is the primary communication information for guests and travel agents to contact your hotel, be sure that you keep this information current.
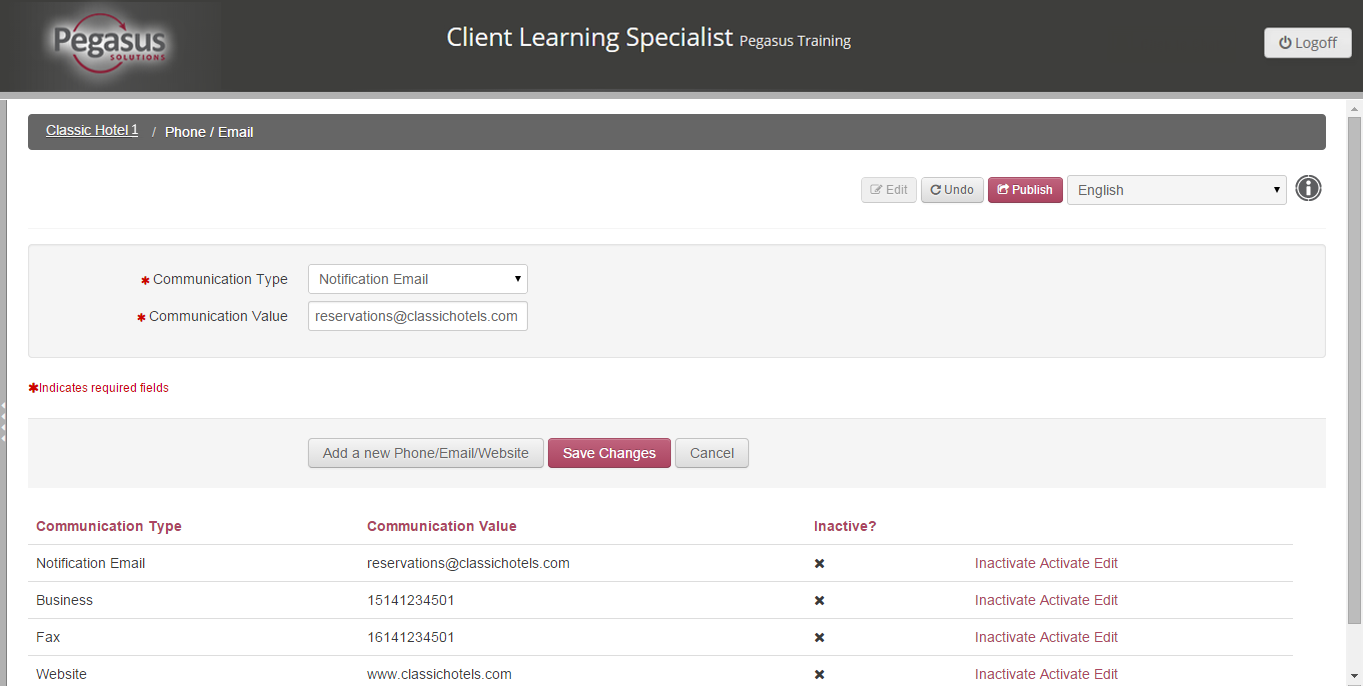
Use the Phone/Email screen to add or edit a phone number, email or web site address. You should add at least:
| Communication Type | Description |
| Business | Hotel main contact phone number |
| Fax | Hotel main fax number |
| Notification Email | Hotel main email address |
| Website | Hotel website |
Note: This is the primary communication information for guests and travel agents to contact your hotel, be sure that you keep this information current. |

Caution: Notification email addresses for bookings and other property messages are not set up in this menu. See Edit Notifications. |
To add a new telephone number or email address , follow the steps below:
Step |
Action |
||||||||||||||||||||||||
1 |
Click the Phone/Email link from your Property dashboard. | ||||||||||||||||||||||||
2 |
Click the Edit button to place the screen in edit mode. |
||||||||||||||||||||||||
3 |
Click the Add a new Phone/Email/Website button. |
||||||||||||||||||||||||
4 |
From the Communication Type
drop down, select the type of information you want to add.
|
||||||||||||||||||||||||
5 |
In Communication Value,
enter the phone number, e-mail address or website based on the
type of record selected.
|
||||||||||||||||||||||||
6 |
Click the Save Changes button to save the new record. | ||||||||||||||||||||||||
7 |
To add another record, repeat steps 3 through 6. | ||||||||||||||||||||||||
8 |
Click the Publish button to publish your changes to the distribution channels. | ||||||||||||||||||||||||
9 |
Click the property name at the top of the screen to return to the Property Dashboard. |
To edit an existing record, follow the steps below:
Step |
Action |
1 |
Click the Phone/Email link from your Property dashboard. |
2 |
Click the Edit button to place the screen in edit mode. |
3 |
Click the Edit link for the record you want to update. |
4 |
Enter the appropriate change in the Communication value field. |
5 |
Click the Save Changes button to save the update. |
6 |
Click the Publish button to publish your changes to the distribution channels. |
7 |
Click the property name at the top of the screen to return to the Property Dashboard. |
Once added, you cannot delete a record; however, you can set the record to inactive.
Step |
Action |
||
1 |
Click the Phone/Email link from your Property dashboard. | ||
2 |
Click the Edit button to place the screen in edit mode. |
||
3 |
Click the Inactivate link for the record you want to remove. The inactive record will display in italic and in red at the bottom of the record table.
|
||
4 |
Click the Save Changes button to save the new record. |
||
5 |
Click the Publish button to publish your changes to the distribution channels. | ||
6 |
Click the property name at the top of the screen to return to the Property Dashboard. |